

Happy New Year! Welcome 2013 -Tuesday, January 1, 2013
 Wishing everyone out there a happy, healthy and prosperous new year!
HEINTZ EQUIPMENT, LLC
1298 RTE 3A BOW, NH 03304
Celebrating 44 Years in Business
HEINTZ EQUIPMENT, LLC
1298 RTE 3A BOW, NH 03304
Celebrating 44 Years in Business
Wishing everyone out there a happy, healthy and prosperous new year!Thanks to Chris in Rhode Island for this nice PRO 1200 Motorcycle Lift Review. We're glad it's been working out for you, and we thank you for the referral! "The lifts are working out Excellent! That guy that just bought the red and black lift w all the accessories was a referral from me & he was very impressed also. Be in contact w you hopefully soon may have more referrals for you."
Thanks to Dennis K., of Westford, MA, for forwarding a photo of the PRO lift in action!
We're happy the lift is working out for you! The PRO 1200 Motorcycle Lift in Action![/caption] "The lift is a great value. Clark was pleasant to deal with. In the future, I wouldn't hesitate to purchase from NHProEquip." Dennis K. Westford, MA


Clark Heintz Tools & Equipment LLC wishes everyone a Happy Thanksgiving! We hope you have a peaceful day with loved ones, filled with good food and good cheer! We are thankful for all of our great customers who keep us going every day.
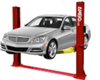
Following the massive success of our first shipment of PRO 1200 Motorcycle Lifts, we are gearing up for an even bigger and better round 2! The PRO 1200 Series Lift certainly surpassed our expectations in a lift, and from all the feedback we've received, it appears to have surpassed yours, too! Please leave us a comment if you purchased this lift! It's so important for others to read about your experience in purchasing this lift, as well as your observations regarding overall quality of this lift. We want to take this opportunity to thank YOU ALL for your support as we launched this new product. We're so excited and encouraged to see the enthusiasm you've brought with your comments, and we are very grateful for all the calls! The PRO 1200 motorcycle lift is priced at $699 and includes so much extra both in terms of features and accessories. The working deck is built with 11 gauge steel, the undercarriage is a heavier material, and the powerful cylinder assembly is capable of lifting 1200 lbs. with ease, expanding the capability of the PRO 1200. Color choices are Black and Orange or Black and Red. The basic lift package comes complete, including a wheel vise; rear pullout for rear tire service; front extension which allows the main table to expand from 24" x 84" out two additional settings up to 24" x 110" for chopper style bikes; loading ramp; and pneumatic foot pedal. Many other lifts are built one piece at a time (a la carte); not so with the PRO 1200. You get a full, complete package at one low price. Optional equipment consists of 12" side rail extension kit to expand the the lift table to 48" width, allowing the lift to accept ATV's, Snowmobiles, Riding Mowers, Jet Skis, and Power Equipment; a Scissor Jack for use on the table capable of lifting from 3 1/-2" to 17 1/2"; and the roller plate which fits into the rear wheel drop out to allow wheel cleaning and service without jacking the bike off the table. Again, pricing starts at $699, a very fair price. The warranty is a full one year. Parts, Service and Support from someone who has been in the business for 39 years and knows what customers expect. Call us today at 603-234-2612 to place your order.
 So, the Pro 1200 Motorcycle Lift has really taken off! We introduced this new lift in August and we've been really pleased with the response. Incidentally, if you've purchased one from us, we'd be grateful for a review on our website! Reviews really guide customers (as they should!) and we've gotten an incredible amount of positive feedback (a big thank you to all of you who took the time to call us and let us know!). Our introductory deal to the public brought us sales that truly surpassed our expectations. If you called in and placed an order with Clark, and are interested in leaving feedback about this lift, we'd be so grateful! It is a VERY quick process! Simply visit our home page, click the "Register" link in the top right-hand corner, and fill out the name and address field, then set up a password...and that's it! You now have credentials to log in and leave feedback for the PRO 1200 Motorcycle Lift. We thank you so very much for taking the time to do this. Since we've had such HUGE response to our Pro 1200 motorcycle lift offer this summer (we've taken a considerable amount of orders, as our next shipment is due to arrive in October), we've decided to add a new package to make shopping a little easier for someone who needs to work on their ATV, Tractor, or Snowmobile...So we've packaged the PRO 1200 Power Equipment Lift kit, which includes side rails, loading ramp and pneumatic foot pedal. A 1 year warranty and your choice of black and orange or black and red color schemes complete the package. Call Clark Heintz Tools & Equipment LLC to find out more about the PRO 1200 Power Equipment Lift.
Reposted from eastwood.com
Although many metals are TIG welded, the metal most frequently associated with the TIG-welding process is aluminum, especially with metals of a smaller thickness. Any other processes, of course, can join aluminum, but in the lighter gauges, the most acceptable process is TIG. The popularity of aluminum in automotive applications has brought TIG welding to a new golden age. Mechanically strong and visually appealing, TIG Welding is the #1 process chosen by professional welders for professional racing teams, auto enthusiast, and hobbyists.
That Confusing Thing About Aluminum The process is well-suited for aluminum, but there are a few character issues of the metal that bring up points that must be considered if this material is to be welded with consistent ease and quality. The pure metal has a melting point less than 1200°F and does not exhibit the color changes before melting so characteristic of most metals. For this reason, aluminum does not tell you when it is hot or ready to melt. The oxide or “skin” that forms so rapidly on its surface has a melting point almost three times as high (3200°+F). To add to this confusion, aluminum even boils at a lower temperature (2880°F) than this oxide melts. The oxide is also heavier than aluminum and, when melted, tends to sink or be trapped in the molten aluminum. For these reasons, it is easy to see why as much as possible of this oxide “skin” must be removed before welding. Luckily, the reverse polarity half of the AC arc does an outstanding job of clearing off quantities of this oxide ahead of the weld! That Aluminum is Hot! Aluminum is an excellent conductor of heat. It requires a large amount of heat when welding is begun, since much heat is lost in heating the surrounding base metal. After welding has progressed a while, much of this heat has moved ahead of the arc and pre-heated the base metal to a temperature requiring less welding current than the original cold plate. If the weld is continued farther on to the end of the two plates where there is nowhere for this pre-heat to go, it can pile up to such a degree as to make welding difficult unless the current is decreased. This explains why a foot or hand Amptrol™ (current control) is recommended with your Square Wave TIG 175 or Square Wave TIG 275 – it enables you to easily change the current while simultaneously welding. Some aluminum alloys exhibit “hot short” tendencies and are crack-sensitive. This means that at the range of temperatures where the liquid alloy is slushy (part solid and part liquid) or just turned solid, it has not quite enough tensile strength to resist the shrinkage stresses that are occurring from cooling and transformation. The proper choice of filler metal and welding procedures, along with smaller beads, can help eliminate many problems of this kind. Some experts recommend backstepping the first inch or so of each aluminum weld before finishing in the normal direction. Filling the Gap The metal produced in the weld pool is a combination of metals that must have the strength, ductility, freedom from cracking, and the corrosion resistance required by the application. Correct choice of filler alloys minimizes the presence of intermetallic compounds and brittleness in aluminum fusion welds. See table below for recommended filler metals for various aluminum alloys. Maximum rate of deposition is obtained with filler wire or rod of the largest practical diameter while welding at the maximum practical welding current. The wire diameter best suited for a specific application depends upon the current that can be used to make the weld. In turn, the current is governed by the available power supply, joint design, alloy type and thickness, and the welding position. The K22 Motorized wheel balancer has a fixed shaft, enabling the wheel to rotate freely on its own bearings. This simulates the assembly of the wheel on the motorcycle and eliminates all the assembly inaccuracies which are inevitable with traditional balancing machines for car wheels, where the adapter is put in rotation with the wheel. Improvements have been made to the K22 include electronic sensors, which automatically detect the wheel diameter and offset. Entering wheel dimensions is now super-fast and error-free with the K22. It has an unbelievably fast set-up and balance time due to the advances in mounting simplicity and updated electronics. The “Fixed Shaft” allows the motorcycle wheel to spin on its own bearings, exactly reproducing the conditions of the wheel when it’s on the bike. Balancing is much more accurate; wheel bearing defects can be detected and putting wheels on the balancer is far quicker and easier than converted automotive balancers. The K22 will handle wheels up to the 240/250 size right out of the box, and an adaptor is available to balance 280’s, 300’s & 330’s. Balancing wheels from singled sided swing-arms is accomplished by the Universal Adaptor for bearing-less wheels. Features of the CEMB K22 Motorcycle Wheel Balancer BALANCING BOTH PLANES: Static (regular) and Dynamic (wider than 4") ULTRA-FAST SETUP: Stationary shaft. (No adapter drive forks/arms to adjust) DIAGNOSE WHEEL BEARINGS: Stationary shaft allows tech to hear noisy bearings DETECT OUT-OF-ROUNDNESS: Abnormal vibrations are felt through control lever FREEDOM FROM ERRORS: Digital electronics guarantee accuracy and reliability Specifications of the CEMB K22 Motorcycle Wheel Balancer RIM DIAMETER: 10" to 24" DISTANCE BETWEEN WHEEL BEARINGS: Phone for Current Specifications POWER REQUIREMENTS: 120V, 1 phase; or 12V DC ULTIMATE ACCURACY: ±1 gram, 1/10oz.


